前面的教程里面,我们搭建了一个简单红绿灯示例,通过在console输出当面的倒计时时间;由于界面上不能显示倒计时,用户体验并不良好,本节我们就添加一个简单的倒计时改善一下。
作为本系列的最后一篇文章,将示例如何处理多个Redux、React的情形;
1、创建Counter类
我们定义倒计时的类名为 Counter ,创建所需要的文件(夹):
1
2
3
|
mkdir actions/counter reducers/counter stores/counter components/counter views/counter

touch constants/Counter.js actions/counter/index.js reducers/counter/index.js stores/counter/index.js components/counter/index.js components/counter/redux.js components/counter/index.less  components/counter/demo.js views/counter/index.hbs
|
创建 Counter 的 Redux 和 React 组件的过程就相当于重复了一下之前两篇文章的过程,代码也不复杂,我这边也就不粘贴了。可自行参考代码,代码托管在 https://github.com/boycgit/demos/tree/master/traffic
可以通过 http://localhost:3000/counter/redux 检验是否正常运行;
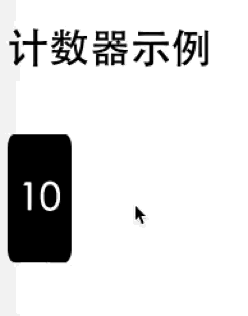
(这个是gif图,如果没动画请点击在新窗口打开)
在假设用户已经编写上面的代码文件的基础上,我们继续讲解如何将 Counter 和 Light 两个组件联合起来。
2、创建入口文件
Redux的三个原则之一 : 单一store,单一reducer 。我们创建两个文件,分别整合之前所写的 reducer 和 store 。
2.1、reducer入口文件
创建reducers/traffic.js文件,作为 主reducer 入口文件:
 1
 2
 3
 4
 5
 6
 7
 8
 9
10
|
import { combineReducers } from 'redux'
import light from './light/'
import count from './counter/'

const rootReducer = combineReducers({
    light,
    count
});

export default rootReducer
|
这里包含了最佳实践法则, 将不同的状态转移关系写进不同的js文件,最后汇总到 index.js 中(这里名为traffic.js,地位是一样的) ,比如后期如果多出一种 “汽车的状态转移” 关系,只要新建对应的js文件,然后再在index.js中的combineReducers函数中多添加一行配置即可;
详细的概念及作用请参考Redux的中文文档Reducer
2.2、store入口文件
创建stores/traffic.js文件,作为 主store 入口文件:
1
2
3
4
5
6
|
import { createStore } from 'redux'
import rootReducer from '../reducers/traffic'

export default function trafficStore(initState){
    return createStore(rootReducer,initState);
}
|
可以看到并没有什么工作量,只是多了几行代码而已;
3、创建应用
前面创建的 Counter 和 Light 算是组件,将两者结合起来,可以视作一款小应用了(假设应用名为traffic);
为了方便管理,专门创建 App 文件夹来存放应用,并创建应用相关的等辅助内容(比如视图等):
1
2
3
|
mkdir app app/traffic views/app

touch app/traffic/index.js app/traffic/index.less views/app/index.hbs views/app/traffic.hbs
|
核心是 app/traffic/index.js 文件,其余文件只是其辅助作用,这边也不重点讲解,可自行到git clone后查看;
3.1、初始化
在 app/traffic/index.js 中引入 Counter 和 Light 组件并设置初始化值:
 1
 2
 3
 4
 5
 6
 7
 8
 9
10
11
12
13
14
15
16
17
18
19
20
21
22
23
24
25
26
|
import React, {Component, PropTypes} from 'react'
import {render} from 'react-dom'
import { Provider, connect } from 'react-redux'
import { bindActionCreators } from 'redux'
import * as LightActions from '../../actions/light/'
import * as CounterActions from '../../actions/counter/'
import Light from '../../components/light/'
import Counter from '../../components/counter/'
import trafficStore from '../../stores/traffic'

// 初始化状态
let initLight = {
    light:{
        color:'green',
        time:'5'
    }
}
let initCount = {
    count:{
        num : parseInt(initLight.light.time)
    }
}
let initState = Object.assign({},initLight,initCount);

// 声明store
let store = trafficStore(initState);
|
- 初始化的时候,我们从绿灯开始;
- 倒计时的时间来自于 initLight.light.time ,这样在初始化状态的时候关联起来两个组件
- 将两个组件的状态(initLight,initCount)合并成 initState ,传给应用的 store,以完成 应用store的初始化
3.2、创建React组件,并链接到Redux
紧接着,使用 connect 方法链接 Redux 和 React组件:
 1
 2
 3
 4
 5
 6
 7
 8
 9
10
11
12
13
14
15
16
17
18
19
20
21
22
23
24
25
26
27
28
29
30
31
32
|
class App extends Component{
    // 占位
}

// 声明 connect 连接
// 将 redux 中的 state传给 App
function mapStateToProps(state){
    return{
        light:state.light,
        count:state.count
    }
}

// 绑定多个actions
function mapDispatchToProps(dispatch){
    let boundLight = bindActionCreators(LightActions,dispatch);
    let boundCount = bindActionCreators(CounterActions,dispatch);
    return{
        actions : Object.assign({},boundLight,boundCount)
    }
}

// 声明 connect 连接
App = connect(mapStateToProps,mapDispatchToProps)(App);

// 真正的连接
render(
    <Provider store={store}>
        <App />
    </Provider>,
    document.getElementById('demo')
)
|
形式和上篇提到的类似,细节略微有些不同:
- mapStateToProps 中返回的对象有两个属性 light 和 count ,在React组件中 对应 this.props.light 、 this.props.count
- mapDispatchToProps 中现将两个组件的方法先和
dispatch绑定,合成一个对象之后再赋值,这样在React组件中使用 this.props.actions 可以调用这两个组件的所有的actions创造函数;
- 最后使用
<Provider>注入 store 实例;
3.3、完善App组件内容
最后,绑定store之后完善 App类 的代码,大部分的逻辑和前一篇的类似:
 1
 2
 3
 4
 5
 6
 7
 8
 9
10
11
12
13
14
15
16
17
18
19
20
21
22
23
24
25
26
27
28
29
30
31
32
33
34
35
36
37
38
39
40
41
42
43
44
45
46
47
48
49
50
51
52
53
54
55
56
57
58
59
60
61
62
63
64
65
66
67
68
|
class App extends Component{
    _bind(...methods){
        methods.forEach((method)=>this[method] = this[method].bind(this));
    }
    constructor(){
        super();
        this._bind('changeColor','handleClick','autoChange');
        this.state = {
            timeId : null
        }
    }
    changeColor(light,actions){ // 红路灯变换规则
        switch(light.color){
            case 'red':
                actions.changeGreen();
                break;
            case 'green':
                actions.changeYellow();
                break;
            case 'yellow':
                actions.changeRed();
                break;
            default:
                actions.changeRed();
        }
    }
    autoChange(){ // 自动更改红绿灯
        const { light,count, actions } = this.props;

        let _self = this;

        actions.countDown();

        let curState = store.getState();
        if(curState.count.num < 1){
            this.changeColor(light,actions);
            curState = store.getState();
            actions.countInit(parseInt(curState.light.time));
        }
        // 自动更改
        this.state.timeId = setTimeout(function(){
            _self.autoChange();
        },1000);

    }
    handleClick(e){  // 用点击模拟红路灯
        if(this.state.timeId){
            clearTimeout(this.state.timeId);
            this.state.timeId = null;
        } else {
            this.autoChange();
        }

    }
    render(){
        // 通过connect 注入 redux 的 dispatch 方法
        const { light,count, actions } = this.props;

        return (
            <div id="traffic" onClick={this.handleClick}>
                <Light light={light}/>
                <Counter num={count.num}/>
            </div>
        )
    }
}

// 声明 connect 连接
|
变换的逻辑都在 autoChange 方法中
- 使用 actions.countDown(); 让倒计时减1,通过 store.getState(); 获取更新后的状态,因为如果直接使用 count.num 获取的是 更新之前 的状态;
- 当 curState.count.num 小于 0 的时候,调用 this.changeColor(light,actions); 更改红绿等的颜色,同时将 新的红绿灯的time值初始化 Counter 组件,这样就完成了两者的绑定
3.4、预览效果
在 http://localhost:3000/app/traffic 中查看效果,效果正如此系列文章第一篇开头所展示的那样,红绿灯搭配倒计时运行:
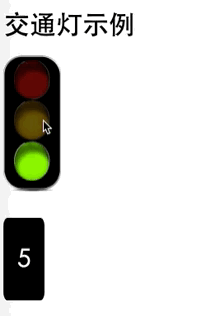
(这个是gif图,如果没动画请点击在新窗口打开)
红绿灯初始状态是 绿灯5s ,继而循环 黄灯3s -> 红灯7s -> 绿灯5s -> 黄灯3s -> …
就这样, Counter 和 Light 融洽地结合起来,完美,happy ending~
4、总结
到这里,Redux 的入门教程算是完结;整个过程下来,你可以体会得到,React只需要关注逐渐的展示就行了,所有状态的管理交由redux即可,这种绑定恰好体现了容器组件和展示组件相分离的开发思想: 只在最顶层组件(如路由操作)里使用 Redux;内部组件应该像木偶一样保持“呆滞”,所有数据都通过 props 传入 。
这里需要再强调一下:Redux 和 React 之间没有关系。Redux 支持 React、Angular、Ember、jQuery 甚至纯 JavaScript。